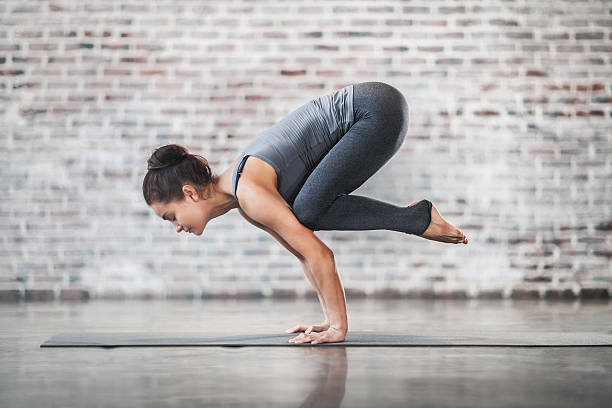
You might have practiced this pose in a beginning-level yoga class. Crow is meant to build strength in your arms in preparation for arm balances. I’ll admit, and perhaps I’m not alone in this, that I thought I would never be able to do this pose when I first saw it being demonstrated.
I looked around to see if anyone else in the room did not want to try. But I kept on practicing, putting my ego to the side. Two months later, I was flying into Crow. It felt fantastic! It’s now my pleasure to help you safely perform this pose at home.
Crow Pose: Benefits
Like all arm balances, the crow pose cultivates concentration, nourishes, and strengthens arms and wrists. This pose also gives us an incredible confidence boost.
Crow Pose Step by Step
1. Spread your fingers out like a starfish on all fours, with your hands shoulder-width apart on the mat.
2. Your toes should almost touch your wrists as you walk your feet toward your hands.
3. Use your triceps to support your knees by bending your elbows in the same way as we do for Chaturanga (Four-Limbed staff pose).
4. As you lift your hips, begin shifting your weight forward onto your palms and finger pads.
5. When you are comfortable, lift both feet. When you are ready to move up a level, slowly straighten out your arms.
6. After five deep breaths, slowly move into Child’s Pose for a few moments to realign your spine.
You can also check out our Tips.
Before you jump into your center of gravitation, gently rock your feet on the ball of your foot to feel it.
Also, engage your core and hollow out your belly. You’ll feel lighter, and the pose will be easier.
It is better to focus on the six-inch distance ahead of you rather than directly between your hands to avoid rolling into a somersault.
I hope you have fun with this posture. Take it lightly, and don’t be disappointed if you can’t do it right away—the majority of us do not. Keep practicing.


